I’m just home after a fortnight in Scotland, which started at the annual DHA (Dyes in History and Archaeology) conference at the University of Glasgow. I tend to know people by their research – and that’s how they know me. Someone at DHA greeted me as Mrs Orchil: she could also have hailed a Dr Indigo, a Ms Madder and Professor Purple. It’s a friendly conference attended by many world experts in the fields of dyes and pigments, but it welcomes independent scholars like me as well as dyers and textile makers.
I wasn’t giving a paper this year so it was an entirely stress-free conference and I sat back and enjoyed it, or at least, all the bits I understood. There are always some technical papers at DHA concerning dye analysis; the ones packed with acronyms, graphs and molecular structures streak comet-like above my head. But factual gems can lurk amongst figures and statistics, so it’s worth not totally tuning out.
I took a small ‘suitcase’ exhibition with me about orchil and my research studies; most delegates came to look at it and talk to me, and as a result I learned new things about orchil from new perspectives.
The conference tour, after two packed days of papers, took us to Glengoyne Distillery for a fortifying wee dram preceding a tour of the plant, and thence to Stirling Castle where we visited the Tapestry Studios to see the final piece in the Unicorn Series nearing completion.
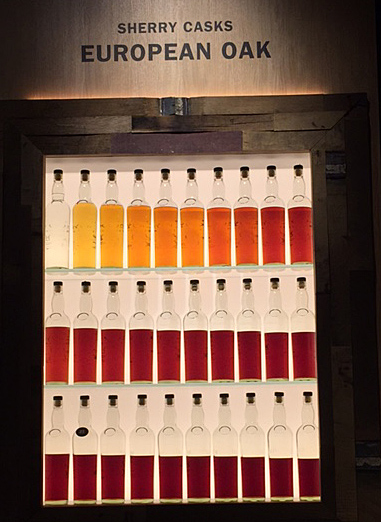
Sherry and tannins
The Glengoyne tour outlined the lengthy procedure for ageing whisky in casks. Casks are made from different types of oak, but have once held sherry (and some, if I remember correctly, Bourbon). The ageing whisky gradually absorbs colour and flavour from the sherry, and the tannins in the oak cask. The two images above illustrate ageing over thirty years in two different types of cask, with coloration intensifying every year. Evaporation is also evident, with around half the liquid being lost over the period. This lost alcohol is called ‘The Angels’ Share’.
Textile Tweets
Lobaria pulmonaria, or lungwort. This lichen is endangered and should not be used for dyeing
Workers’ cottages at Alexandria, Levenside, near old Turkey Red works
Explanation of ‘crotal’ from Dwelly’s Gaelic dictionary. Note the old name for lungwort ‘Stricta pulmonacea’
The Plaiden Ell at Dornoch. Two metal pegs set apart in the slab created the standard measurement for cloth
Ochrolechia tartarea, or the cudbear lichen, on the banks of Loch Ewe
Visit to Stirling Castle on DHA tour to see the last of the Unicorn tapestry series being woven
Explanation of ‘corcur’ from Dwelly’s Gaelic Dictionary
About the pictures
Above is a small selection of textile-related images from Scotland, most of which I tweeted during our trip. My obsession with dye lichens was rewarded by finding Ochrolechia tartarea alongside Loch Ewe, and Lobaria pulmonaria at Oban; Parmelia saxatilis and P. omphalodes were growing at many locations. Note: I was looking, not collecting. A Gaelic-English Dictionary in a hotel room confirmed that in Gaelic crotal refers to boiling water method lichens, but corcur to orchil lichens. If you want to know what orchil is, or read more about my research and views on dyeing with lichens, please visit this page.
Turkey Red
I spent a week with Deb Bamford (aka The Mulberry Dyer) learning how to dye Turkey Red at a Summer School in 2013. Read about it from this blog post forwards. In Scotland I found remnants of the Turkey Red industry buildings at Alexandria, on Levenside. There is a great website about the Turkey Red industry here. And read this wonderful book:
Colouring the Nation: The Turkey Red Printed Cotton Industry in Scotland c1840-1940 by Stana Nenadic and Sally Tuckett. Published by National Museums Scotland. From Amazon here.
Unicorn Series: Stirling Castle and West Dean Tapestries
For more on the Unicorn Series, go here for the Stirling Castle story, and here for West Dean’s version.
Blue stains which developed after rubbing Japanese indigo leaves onto paper
I planted out my Japanese indigo (Persicaria tinctoria) several weeks ago, having grown it all from seed. This week I picked some leaves and rubbed them on the page of my sketchbook to see if any blue appeared. It did (ignore the buff coloured stain to the left of the image, which is nothing to do with it). From this I knew that I could make a vat from the crop.
I began by picking half a bucketful and testing it as a small vat. I achieved a very good blue, which was used to overdue some cochineal-dyed scarves I had shibori-tied ready and waiting. You can see the result in the gallery below.
On the second vat I used a whole bucketful of leaves, rammed down hard. I just pick the tips, like tea: not the whole stalk. I sometimes weigh the leaves before processing but the material was wet after rain and there didn’t seem much point. I don’t always strip the leaves from stalks either, so a known dry weight is somewhat academic because the stalks don’t, as far as I know, produce any colouring matter.
On the day I dyed the second bucket I live-tweeted the various stages with images and received a good response. I think more and more people are trying to grow, and dye with, their own indigo.
With colleague Christina Chisholm I co-authored a piece on growing and using Japanese indigo for the Journal for Weavers, Spinners and Dyers in 2011. It was a free download and you can still access it here so I don’t have to write it all out again. We included some information on growing the plant in two distinct climates (Devon and north east Scotland). Christina has much more experience with dyeing wool, so fibre dyers might find her comments useful. If I were to be able to edit the article I’d make a couple of additions / amendments:
1. I have since found that I don’t always see a blue froth when I whisk up the strained dye bath. Instead, the sherry-coloured liquid darkens and looks greener – but the froth is often colourless. Why? No idea. These days I have stopped using soda crystals and use washing soda instead. Maybe that’s the reason.
2. I have found that leaves are often ready whether or not they have the red/blue tinge shown in the Journal download document. What I have heard since (but don’t know if it’s true) is that you need to use the leaves before the plant produces flowers.
3. I try to encourage flowers for seeds each year and there is some urgency about this as in the UK the plants die with the first big frost. I mark a few vigorous stalks early on by tying a conspicuous ribbon round each one. Then I can’t pick them by mistake. I let these stalks develop flowers as early as possible.
Leaf tips after gathering
Bain-marie used to heat leaves in water
Leaves are crushed in the liquid
Leaves are sieved and squeezed out
Passing liquid from bucket to bucket to oxygenate
Liquid after addition of washing soda and oxygenation
No posting recently because I’ve had a month of intensive teaching followed by intensive feet-putting-up. I ran three courses at Ardington in Oxfordshire and then four days in Nether Stowey at the studio of Janet Phillips.
Several vats on the go
Cochineal and indigo
Cochineal and indigo
At Ardington School of Crafts I taught my synthetic dyes shibori day, plus two one-day (repeated) courses on natural dyes. The natural dye course is a taster to a fascinating subject with some practical work at the dyepots, but also intended as an eye-opener to textiles seen at a stately home, museum etc. It’s even relevant to looking at paintings: I often wonder what dyestuffs were used on garments represented (with pigments) in a historic portrait. We had to move fast, with all fibre and fabric pre-mordanted, and an indigo vat ready to go. Most students dyed a scarf using simple immersion methods. We used madder, weld, cochineal and two indigo vats (one weak, one strong).
At Nether Stowey, I taught a three-day-dye course to several of Janet’s graduates from her Masterclass. On day one they learned some shibori folds using steam-fixed dyes; day two gave them a taster of wax resist, and day three was a full day with indigo. At the same time as I taught dyes, Janet was teaching ‘shibori on the loom’ to students from the London Guild. In this technique, removable weft threads are incorporated into the weaving. They are later used to draw up the cloth tight. According to how the shibori threads are woven, patterns emerge after the piece is dyed, then opened up.
Students used coloured and plain warps, on different pieces. Some of this shibori work was put into my indigo vat on day four; others used Janet’s fibre-reactive dyes which were applied by placing woven pieces into a short length of gutter (brilliant idea) and painting by hand. I am used to folding, tying and clamping for indigo work and although I have seen loom shibori before, I haven’t watched the whole process from start to finish. A combination of enthusiastic and knowledgeable students, Janet’s teaching and the imaginative arrangements made by Janet and Nigel made for a very enjoyable week. Did I mention glorious weather?
Loom shibori gathered up for dyeing
Undyed loom shibori being opened
Indigo-dyed loom shibori
Fibre-reactive dyes applied to loom shibori
Indigo-dyed loom shibori
Many thanks to students at Ardington and Nether Stowey for permission to use images of their work.
Teaching in 2015
Dates of next years’ courses are accumulating. I will be tutoring two courses at the Association of Guilds of Weavers, Spinners and Dyers Summer School in August 2015 at Moreton Morrell. Details of the entire event can be seen here and there are details on this page.
I am teaching a new one-day introductory course in wax-resist at Ardington School of Crafts in 2015 as well as days on shibori scarves, indigo dyeing. The Vibrant World of Natural Dyes proved very popular this year and I will be teaching it again in 2015: I have one course at West Dean scheduled for March. If you want to sign in, do so soon because my October course has been full since April.
Packs of indigo and Rubia cordifolia, (Indian madder) shown with Phytosanitary Certificate
My latest excitement is today’s arrival of a parcel from India, containing indigo and Indian madder (Rubia cordifolia) from the excellent KMA Exports. I am sharing the consignment with a friend because the freight is expensive and costs more than the dyestuff, but it took just one day to arrive from Tamil Nadu. Sometimes a parcel takes longer from Okehampton. It would have been here earlier but import regulations into the UK now require fumigation which takes a bit longer; the Phytosanitary Certificate confirms that my consignment is free of Khapra beetle (Trogoderna granarium) and other quarantine pests.
Having tried Rubia cordifolia with Deb Bamford at Summer School last year I can’t wait to have another go. It produced the most astonishing colour on wool.
A highspot of recent weeks was a short trip to Finistère in Brittany, in the glorious weather also enjoyed in the UK that week. I enjoyed seeing fine examples of Breton embroidery, something about which I knew nothing, in the Musée Bigouden, Pont l’Abbé. There is an informative page about traditional Breton costume here from which I’ve learned a lot. You can see a photo of the embroiderers of Pont l’Abbé at the top of the page. Until I studied the caption I thought it was a very old photo, but it is dated to 1976, when I was about the age of some women in the picture. Perhaps that does make it a very old photo, come to think of it.
Several walks along the coast west of Douarnenez offered stunning views over the sea and as always, I was on the lookout for lichen. I don’t collect it, but I like to find it; my views on actually using lichen for dyeing are here. A knowledgeable colleague has told me that one of my images probably shows an orchil lichen, one of the Roccellae, which cheers me up now I’m back and the weather has changed.
The historic cork floats and netting tools, which I found rather beautiful, were in the window of shop selling fish in Audièrne. Without a given explanation, I must assume the carved names once indicated owners of nets. When I lived on the west coast of Scotland I remember several vitriolic exchanges over ownership of creels, buoys and nets. This appears to be a simple way of marking equipment.
Embroidery, Pont l’Abbé
Embroidery, Pont l’Abbé
Embroidery, Pont l’Abbé
Corks and netting tools, Audièrne
Orchil lichen?
I’m teaching three courses at Ardington School of Crafts from Wednesday. Natural dyes on Wednesday 9th and Thursday 10th, and shibori with synthetic dyes on Friday 11th. If you’re coming, I look forward to seeing you there.
On the recent Brilliant with Pattern course at West Dean one of my students had brought along something unusual. It was an Eastern European kystka. These small tools for applying hot wax are used, particularly in Ukraine, for the decoration of Easter eggs known as pysanky. I’d heard of a kystka but never seen one and until I started to research today’s post I knew nothing of the pysanky tradition. Wikipedia has a page on it here; it is a full and fascinating read which explains symbolism in the colours, the motifs and the actual giving of the eggs. It describes the ancient heritage of the craft, how patterns and methods were handed from mother to daughter, and the tools used. The list of pysanka recipients each Easter is especially interesting, revealing ‘life priorities’ of the givers. It includes a gift to the beehive, and eggs to the graves of deceased family members.
A list of natural dyes in traditional pysanky includes familiar names, such as alder buckthorn (Rhamnus frangula), Dyer’s Broom (Genista tinctoria) and green walnut husks from Juglans nigra. The Wiki article introduced me to two new words in the language of symbols: scevomorphic and cosmomorphic. To find out what they mean, follow those links to a website about pysanka tradition.
And in case you’re wondering how to pronounce pysanky, this is what the pysanky website says:
Despite what you may have heard on the Food Network or in a local class, ‘Pysanka’ is pronounced ‘PIH-sahn-kah’ (with the plural ‘pih-sahn-KIH’), with all short vowels. The term ‘pysanky’ is not, never was, nor will it ever be correctly pronounced ‘pie-SAN-kee’!!!!
Olga Kryway using a kystka. State Archives of Florida; photographer Robert L. Stone; 1994
Collection of decorated eggs from Bavaria
The kystka sent to me
My West Dean student (not the lady in the image above!) showed me how she uses her kystka on silk fabric. I was impressed because it was clear that the tool adapts well to applying fine lines to fabric and it doesn’t drip. I have never felt wholly at ease with a tjanting, although it produces beautiful fine lines in expert hands. The reservoir and spout of the kystka is made of brass but looks similar to the ‘rotring-style’ heads I used to use to apply spirit-based gutta resist in pre-wax days. The reservoir is small and the hot wax would soon run out, but one can adapt to this. I am wondering if I could improvise my old, now-unused gutta nibs into home-made kystkas. But brass may be a preferable metal with hot wax than steel ‘rotring’ nibs and I’ll have to try it out.
A greeting to Ukraine This post sends a special greeting to L, a reader in Ukraine, who has been a regular visitor to my blog until all the current distractions. I send warmest spring and Easter wishes at a time of continuing anxiety.
Update: a reply from Ukraine I had a reply from my reader L, recalling their grandmother using onion skin dyes to make krashanky, which are one-colour-dyed eggs. The skins were collected well in advance of Easter so that there were enough to make deeper colours. In Ukraine, the kystka is called a pysachok. My Ukrainian correspondent also recommended a great website here. Teresa Mihalko Harbert is The Real Thing when it comes to decorating eggs and the Trypillian culture, which provides some of her inspiration, a source of some superb patterns. Thank you L.
Acknowledgments: The image of Olga Kryway is by Robert L. Stone from the State Archives of Florida which allows reproduction for educational use. Florida Memory, http://floridamemory.com/items/show/108313
Thanks also to R for allowing me to reproduce an image of her family’s beautiful collection of decorated eggs and to A for the generous gift of a kystka.
Just before Christmas I wrote about my experiment making ink from oak galls. Read it here. I tried using the mixture as an ink fairly early on in the experiment, using recipes found on the internet, with disappointing results. It came out very pale and did not darken with exposure to light as I had read that it would. That could be for many reasons. I maybe didn’t use enough galls, or fresh ones, or I hadn’t left it all to soak enough; maybe the mixture was insufficiently concentrated; maybe I hadn’t added enough iron. I also learned that ink would flow better with the addition of gum arabic. I couldn’t find my stock of gum arabic, so I sent off for some (in powder form).
Galls still soaking
Ink, round one, without gum arabic
Gall ink with gum arabic
Ink, round two, concentrated, and with addition of gum arabic
When the gum arabic arrived I decanted some of the gall liquid, added an iron mixture (made from rusty nails and vinegar) and allowed it to reduce naturally by leaving the jar in a warm dry place. I hoped to concentrate the pigment. I then added a small quantity of powdered gum arabic and made some drawings and scribbles using sharpened twigs: a proper quill pen would have been great, but I was short of a goose. The second ink result was somewhat better than the first, but having looked at some manuscripts written in gall ink, I think it could be a more intense brown/black. I’m leaving the galls to continue soaking and will try again later in the year – as well as looking for more samples in late summer when they will be fresh.
Time will tell if I have used too much iron and my ink rots through the paper – definitely a problem with ‘over-ironed’ dyes of the past which ate their way through wools and silk.
I spent my childhood in the New Forest and have enjoyed following artist Stephen Turner’s blog about his year in the ‘Exbury Egg’. I know the area he is writing about intimately. Coincidentally, Stephen has undertaken a similar experiment with gall ink and you might like to look at two of his posts. He describes collecting galls here, and his ink results here. Stephen’s observations on the Turkey oak (Quercus cerris) were completely new to me: apparently this species was reintroduced into the British Isles in the eighteenth century and there were concerns that acorn production, vital for the local feeding of pigs, was affected by the arrival of the Turkey oak and its attendant galls. The Oak Marble Gall Wasp (Andricus kollari), for which a Turkey oak is vital, is responsible for the marble galls Stephen used.
The galls I collected in Devon are not the same thing as Stephen’s New Forest marble galls. They were found on a different type of oak and produced by a different wasp. But as far as I know all galls are tannin-rich and can be used to produce ink. So I’ll keep try-ink. Sorry, couldn’t resist that one.
Breaking news.. extra course at West Dean: Brilliant with Pattern
Because my West Dean course in March has a waiting list double the size of the course itself, the organisers have scheduled an extra course from 9th – 11th May. See the West Dean programme here. You can also download the full West Dean College Course programme here.
Back in 2011 photographer Steve Kenward started on a mission. It was to be an unfunded personal project, of more or less infinite scope, which he called Made Not Manufactured. His idea was to travel the British Isles to photograph ‘people that use traditional crafts to make something that still has relevance today.’ Steve’s paid work as a freelance photographer would fund the entire project which includes his travel, accommodation, and any other personal expenses.
He put the word out for craftspeople / participants through the Heritage Crafts Association (HCA) and soon found that makers of objects such as baskets, boats, rakes, bowls, knives and clocks began to contact him. You can see the results of this committed photographic portrait of British craftsmanship on Steve’s website here. I contacted him as a dyer, and feeling that natural rather than synthetic dyes were more relevant to his ‘traditional’ aims, I made an indigo vat from my crop of Persicaria tinctoria for his day in my dyeroom. Up in my studio I worked with a beeswax resist on the beginning stages of a silk scarf. With Steve’s permission I am including some of his images below.
Steve has photographed 43 craftspeople (plus 13 dogs, including mine) and travelled 5,300 miles – at the last count. Until yesterday, I believed his arrangement to exhibit the complete body of work at the Weald and Dowland Museum in Sussex in August was still going ahead. It seemed the ideal venue to celebrate the work of so many makers, some of whom were prepared to demonstrate their craft, and show Steve’s unique collection of photographs. But something has gone seriously amiss; it seems there is no funding to support the exhibition project and the arrangement has been cancelled.
I feel disappointed for Steve who has worked extremely hard to achieve his aims. He is an unobtrusive but enquiring observer as his photographs demonstrate but also a delightful guest: even the dog approved, although she took exception to having a tripod in the house.
Steve is now looking for another exhibition venue for this body of work. If you know of somewhere suitable, please contact Steve through his website and while you’re there view other images of his impressive project.
Footnote: I resolved that my dog would never appear on this blog, but here she is, as seen by Steve Kenward. As today is her 100th birthday in doggy years, I think there is something to celebrate.
Extreme Ironing takes place at the start of making folded and clamped shibori and if I’m not in the mood, it can be tedious and exhausting. The next bit is great as it’s working with dyes, but the best is the Christmas Stocking moment of opening up each dyed scarf. That comes after the ironing, but before the steaming.
With wax it’s the other way round. You do the evil stuff after the creative work with wax and dyes is complete. There’s a lengthy sequence of de-waxing, steaming, cleaning and washing out residual wax, etc before the scarves are ready.
Flight of Birds: red
Shibori: clamped resist with steam-fixed dyes
Australian Journey: Pilbara
Shibori: clamped resist with steam-fixed dyes
Zig-Zag red
Zig-Zag multicolour
Labels, lists, tissue paper and scarves for despatch this morning
But however they are made, all scarves need a sewn-in label, a personal label / swing tag and a price tag with a stock number. My personal tags were designed for me by Chameleon Studio, a local Devon company. We chose recycled card and vegetable-based inks for the two types of label. I have one for natural-dyed and another for synthetic-dyed work; they look different but the design is related. On the left, you can see the two types of label. The buff label with plummy-coloured ink is the one I use for natural-dyed work. The full-colour image on an individual label is actually a sticker which I attach one by one. It was a brilliant idea of the designer’s to reduce costs on printing because sheets of sticky labels are much cheaper than full-colour printing on card. Once everything is labelled and listed for despatch to a shop or gallery there is always a list to fill out and a package to make up, followed by a trek down the hill to the local post office. Post-dog usually helps with this part of the process.
The latest batch of work has gone down to the Devon Guild of Craftsmen whose Christmas Show ‘Make 2013’ begins at the end of this week. It’s open daily from 10 am – 5.30 pm.
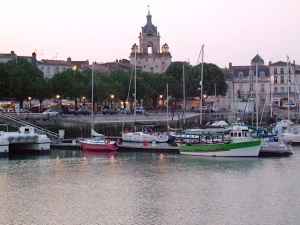
I’m back from a trip to the DHA (Dyes in History and Archaeology) Conference in La Rochelle. La Rochelle hosted the ISEND Conference in 2011 and so I was already familiar with the conference venue – a former fishmarket, now the exhibition and conference centre L’espace Encan.
This is a text-heavy post, so here’s a picture of La Rochelle to keep you going.
La Rochelle
A DHA conference annually attracts a wide variety of delegates from various disciplines. This year there were about 90 of us. Our number included chemists, conservators, artists, historians, researchers working with natural dyes, and students at various academic levels. At a DHA conference you can find yourself sitting next to someone from the British Museum, the Louvre or the Rijksmuseum, or an independent scholar who is simply passionate about parchment. It is a friendly assembly and all are welcome. Even if, as a non-chemist, you sometimes sit boggle-eyed through muscular technical papers full of graphs, analysis and molecular data, there is always something to be learned. I’m told that in early DHA days (this was the 32nd meeting!) there was a heavy bias towards these more scientific analytical papers but that nowadays the balance is more even, with a good mix of historic /scientific presentations. The selection committee who choose proposed papers must have an intensely hard job. Of the 24 or so papers accepted, several intrigued me but as none have yet been published this handful of comments remains general.
Purple Parchments
One paper involved the analysis of purple-dyed parchments. Very little work has been done to analyse the source of the purple colour in such codices and as far as I understand, there is currently no scientific evidence that shellfish dyes were used on the parchments. Non-invasive methods are normally used in their analysis, essential if precious manuscripts are to be studied without damage, and these methods can make it more difficult to identify dyestuffs. (With a parchment it isn’t so easy to remove a physical sample as it can be from a textile, where a loose fibre may be available).
There was a mention of dyeing parchment with orchil, and my ears twitched. Last year I was asked to dye some parchment samples with orchil – and dye they certainly did. But it was apparent that the temperatures and immersion involved in dyeing with orchil stiffened and damaged the parchment quality. I felt that this method wasn’t viable. Cold-dyeing seemed to yield a more sympathetic result but I have no idea to what extent the parchment quality was affected as I was only sent miniscule pieces of parchment to dye.
In the post-presentation question session it emerged that the term ‘dyeing’ means different things to different people. Some delegates considered ‘dyeing’ could be the layered painting on of dye and not dyeing by immersion, as working dyers think of it. Now, I should say that I tried painting orchil on too, but soon lost the will to live. It would be immensely protracted to paint on sufficient orchil to build up a good colour. That’s not to say it would be impossible, I just didn’t have the time or the resources to continue.
It will be interesting to learn more about this research. Maybe at Glasgow and DHA 33 next year? The dates are October 30th – 31st 2014.
Shearings and Clippings
Magnified images had been studied by the presenters which showed lumpy-looking particles in the red lake used in several medieval paintings. These indicated that they were reclaimed dyes from red-dyed wool, made into lakes for painting. The reclaiming of red lake pigment dyestuffs from clippings of dyed wool revealed that it made good economic sense to extract the dyes and to reuse them as painting materials. The dyeing of red, from whichever dye source, was expensive and thus waste material might be reprocessed. Again, I encountered problems with a mutual understanding. Initially I was confused by the words ‘shearings and clippings’ which were used by the presenters. I associate these words primarily with sheep-shearing! In the paper the words referred to waste dyed cloth after cutting woven material – or yarn.
The finding of these ‘reclaimed reds’ isn’t in itself new. A 1996 paper by Jo Kirby and Raymond White goes into great detail (find it here) and also lists a number of paintings in which red lake pigment dyestuffs have been found. Have a look. You may be amazed.
Networking
A couple of years ago, at DHA in Lisbon, I presented a paper about the trade in dye lichens from Angola through Lisbon. I have yet to publish this, for several complicated reasons. But I had an interesting conversation with another delegate which led me to sending a very small quantity of dye lichen and a recipe to the University of Évora. I heard no more, and forgot all about it. At La Rochelle my Portuguese colleague and her team presented a paper in which they had measured and tracked the breakdown of the depsides and depsidones (the dye precursors) in the orchil preparation process until purple chromophores formed. Chromophores are the part of the molecule responsible for colour. The chemistry was patiently explained to me in a coffee break and I now understand rather more about the process that before – although I wouldn’t like to take an exam just yet. DHA is great for this kind of contact and co-operation.
DHA=GFZ: A Gremlin Free Zone
If you read the previous post you will now that I was co-presenting a paper at DHA 32 and I wrote about the snaggly-toothed IT gremlins that lurk for unprepared presenters. I am pleased to report that my eminent co-author, Zvi Koren, had done an admirable job on gremlin-bashing (he’s ace at puns too) and everything loaded and presented totally as expected. So did everyone else’s, and we all benefited from calm, unobtrusive technical expertise delivered by Florent Glatard of ARRDH- CRITT Horticole. Our presentation was really well-received but I will not be writing about it until formal publication.
Thanks to DHA 32 organisers Anne de la Sayette and Dominique Cardon
Anne de la Sayette is the Directrice of ARRDHOR – CRITT Horticole, a ‘centre of research, innovation and technology transfer in horticulture’. Dominique Cardon is well known to most natural dyers as author of Natural Dyes: Sources, Tradition, Technology andScience. She is also Emerita Senior Researcher at CNRS, the French national centre of scientific research. CIHAM UMR 5648 CNRS (an institution, not a mathematical equation..) is one of the most important research centres in France for history, literature and archaeology of the Middle Ages. A new book by Dominique is about to be published but I don’t have the details: as soon as I do I will add them to a post.
Carnac
If you have got this far you deserve a pictorial prize. Using photos from DHA is tricky as I feel I should ask people’s permission before posting their images on a blog, so here is something rather special from the trip home.
Orchil lichen on stone at Carnac
One of the Carnac alignments
Viewpoint over Kerlescan alignments
I had never been to Carnac in Brittany until last week and I had no idea of the scale and breadth of the entire site. But it seemed most serendipitous to discover, on some stones of the alignments, a quantity of orchil lichen. Naturally, I did not touch it. But here are some images to reward stalwart readers. The orchil lichen is in the left hand image only.
I’m halfway between two presentations. The first was for the 6 Guilds of Weavers, Spinners and Dyers at Stratford where I spoke about orchil and how the trade in lichen dyestuff reached global proportions in the late nineteenth century. I thoroughly enjoyed my day at Stratford which included a talk by co-speaker Joan Baxter on the way the East Sutherland landscape influences her tapestries. Her recent collaborative work with dancers Between the Web and the Loom was interesting and she showed some video clips. But I can’t find any images on the internet to provide a link beyond this one (about the dance) and this one (about the tapestry she wove).
The second presentation is for the Dyes in History and Archaeology Conference (DHA) in La Rochelle, France. That’s later this week, is about something else entirely, and it’s going to be rather sensational.
Friday 4th October
11:45 Treasures from a Leeds Dye Chemist: A Century-Old “Tyrian Purple”?
Isabella Whitworth, Zvi C. Koren
If you want to know more about the sensational, come to La Rochelle. Otherwise, I’m sorry, you may have to wait a little. To download the whole DHA La Rochelle programme, visit this page and follow the links at the bottom.
For the moment, here is a taster in the form of some images. You will see two men, both chemists. There is a brother and a sister, and the son of a famous father.
Charles Samuel Bedford
Annie Perkin, née Bedford
Arthur G Perkin, second son of Sir William Henry Perkin
Lectures and technology
Those who are of ‘a certain age’ will remember that one of the worst things that could happen when giving a lecture was that you dropped all the slides just prior to going on stage then reloaded them upside down, in the wrong order and back to front.
Technology wasn’t satisfied with such piffling levels of stress. So it created Macs and PCs and system updates; memory sticks and SD cards and PowerPoint and embedding. It now arranges that hosts provide an ancient laptop unable to read anything post 1910; it organises missing leads, the wrong leads, deflating batteries, clickers that die, videos that won’t load and projectors which will have nothing to do with your laptop.
I have watched entirely respectable speakers show a presentation devoid of images because they haven’t checked their Mac presentation on a PC – or haven’t embedded their photos.
As a result I am obsessive about options. At the 6 Guilds event I took my own Mac laptop, own projector, requisite leads plus a boggling array of memory sticks and SD cards correctly formatted and checked out on a neighbour’s PC. In fact, the options proved unnecessary as the 6 Guilds laptop was up-to-date, the memory stick loaded, and two super-calm techies were in control.
For DHA, all presentations have to be sent in advance of the Conference which is good sense – in theory. You will be informed that something has arrived, but you still don’t know if the presentation shows exactly the way you designed it. So, when you get there, you need to check – and have some options up your sleeve. I didn’t do the DHA PowerPoint: my co-author did, for which I am deeply grateful. It can all be his fault.